I've moved! New blog address.


My new website + blog is emilyneuburger.com.  Please visit me there!

If you have this site bookmarked in a blog reader, you'll want to switch to emilyneuburger.com.

Thanks, and see you in my new space!

xo emily
Showing posts with label holiday. Show all posts

Valentine's Day Fortunes

This Valentine's Day, instead of giving away hearts and candy, we're gifting fortunes.   I love the tradition of giving our friends sweet messages and tiny handmade tokens in the depth of winter. If you live in the northeast, you know how much we are all looking forward to something that will distract us from the unending snowfall.  So, yay!, fortunes!
We designed something that looks like it might come from one of those old fashioned fortune telling machines, like in the movie Big.  We used kraft paper and washi tape to make the small envelope.  We printed the word "fortune" on a piece of colored paper, and used the paper slicer to cut it into strips.  Then, we glued the label onto the envelopes, and stuffed a fortune inside each one.  The children decided that each fortune should have a tiny picture drawn with an art pen and filled in with colored pencils.

The best part about this idea is that the kids get to tailor the fortunes to the personalities of their friends. These are some of the fortunes that came out of our thinking session from the other night:

You are a strong climber.  The next time you climb something tall, you'll have a brilliant idea.
Sometime today, your smile will brighten will make a sad person feel happy.
On the next clear night, count 20 stars and make a wish.  A portion of the wish will come true.
Pay attention to round things.  They will be important in achieving a big goal.
The number 5 is important for you this month.  Pay attention and use the number wisely.

Maybe swirling your hands around a big glass marble/crystal ball might help with the fortune telling? 
Happy weekend, my friends!

From me to you: Four Valentine's Day Heart Projects


With February just around the corner, it is time to start thinking about bright colors, quirky little hearts, and sweet scribbled messages.  In New England, where everything is frozen and white, the bright colors of Valentine's Day is a nice thing to look forward to.

These are four of my favorite heart projects that I've created and featured over the years.  

1. Heart Magnets

2. Sew-A-Heart

3. Rings and Things

4. Conversation LOVE Rocks  (as in, Love Rocks! and You Rock! etc., etc..)

Have fun with these, my friends!  You have my heart(s).

xoxo emily


Home

On Friday night, we arrived home from a week at the ocean. Considering how frightening and worrisome the past month and a half has been for my family,  I was sure we were ready for a happy adventure. A visit to the sea seemed like just the thing to recharge our spirits.  Looking back, I should have known that driving away from my town, the place where my father fell ill and is now recovering, was going to be nearly impossible. Nearly, but I did it!  I was shaky and teary when it was time to leave, but after a few good conversations, I found my place in our stuffed car.  And, I'm so glad I did.
This kind of beauty was so good for my mind.  The thing about the ocean is that it reminds me to just be in the moment because of how quickly everything changes with the tides.  Just when I think we've found the perfect wading spot, it becomes an island, and then dry land.  And, when we want to find the same swimming spot the next day, we'll have to come at a different time of day.  The ever-changing ocean is a lesson in letting go of what is coming next, and being at peace with what is here now.


But, hey, some things are always the same:  the wet skirts, the drippy hats, the splashing in the waves.
The chocolate.  (This was dark chocolate dipped at the Hot Chocolate Sparrow in Orelans, MA. I HIGHLY recommend a trip if you are anywhere nearby)
Here is my oldest, scanning for turtles.
And, my youngest, asleep after a long day.
Sister yoga at the Wellfleet Bird Sanctuary.

There was also fried fish, clams, margaritas, miniature golfing, bicycling, playing in waves, etc. etc.

And, now, onto the next summer adventure: camp for the two oldest and projects in the house for me and the baby.  Onward.

Most photographs are from my Instagram: @redbirdcrafts.


p i c t u r e d :: holidays!


* cloves, cardamom, black pepper, etc. for our homemade chai masala.

*little teapot cards for our chai gifts

*our jars of chai packed and ready to go

*gray, gray, gray, and beautiful.  #nofilter

*cat in a basket.

*someone couldn't put it down. here, she is literally lost in a book.

*packing it all up on New Year's Day.  sad/happy


There was so much beauty in our quiet days together and lots of excitement in making and giving.  I'd love to see one of your holiday moments.  Will you share one in the comments?

xox e      

Show Me a Story :: Launch Party on 9/15!


I'm  so happy that my book launch party will be at 'The Cup and Top Cafe! It is wonderful, fun space with delicious, fresh, healthy food and lovely people.  I'll be running a craft, signing books, and there will be fancy cake (baked by the talented Cup and Top baker).  If you  happen to be within driving distance of Florence, Massachusetts, I'd love to see you there.   Saturday 9/15 from 11-1.

For now, Happy Labor Day to all those in the states! We spent bath time last night chatting about workers' rights and all of that good stuff and today we're thinking about those who work extremely hard each and every day.


xo e


July 4th


Happy 4th of July to all those who live in the states.   Tom mowed the lawn.  The kids romped, and I baked a cake, did a bit of thrifting, and worked on some exciting plans for my fall classes.   We'll be eating dinner with my parents and my aunt and uncle in a few hours. It is a good day.

The recipe for the flag cake is from here. Deb says that the people at her party raved and gushed about it.  I'll let you know how it went on my end. Why the disposable tinfoil pan?  Because, as it turns out, I don't own a 9" x 13" pan (I know!), so I had to act quickly.

Have fun! Splash! Yum! Boom! And, all of the rest.

xox e

XOXO

 I wish you a day full of color and cheer.
Consider giving yourself a valentine by thinking about the things, activities, and experiences that fill your heart.  The children in my creative journaling class discovered that their hearts are a big eclectic mix filled with things like whipped cream, fuzzy socks, lemonade, trees, popcorn, the ocean, painting, Harry Potter, bike riding, and pie.   I made the below heart based on a blend of some of my student's  suggestions. 
Just contemplating what makes you happy is a gift to yourself.  A little self-affirmation goes a long way.

L O V E
e

v a l e n t i n e s


Here are a few of my lovey dovey crafts from the past.

heart magnets

fabric heart necklaces

heart rings

heart strings

conversation love rocks

heart clips

I promise to be back soon with news about my book (title sharing will be involved) and a give-away from a super talented local artist. Sorry for the delay in posting these days.  We've had some important life stuff to attend to. 

'Tis the season to hear scissors wildly snipping with bits of paper hearts scattered about the house.

xo e

Sew-A-Heart Valentine Tutorial


I have hearts and bright colors on my mind.  Do you?
Sew and give. Thread and sit by the fire.  Bring them in the car or on the train.
Have children draw their own shapes (abstract designs are wonderful!) or draw some for them.
You do some, they do some.   You know how it goes.


This is the kind of activity where everyone participates at their own pace and speed.  

I  love how the colorful yarn is so bright against the humble cereal box. Its almost like a bit of cozy, cheer threaded through a regular, everyday moment.  


Materials:

cereal box panels
yarn
tape
scissors
pencil
1/8 inch hole punch
awl (or nail)

How To:

1. Cut cereal box panels into small squares.
2. Use your pencil to draw a simple shape onto the plain, brown side of the square.
3. Use a 1/8 inch hole punch to punch holes on the pencil line, leaving about 1/4 of an inch in between each hole.
4. Since there will be some places on the shape where the hole punch won't reach, use the awl (or a nail) to fill in the blanks.
5. Find an extra long piece of yarn (36" should be more than enough).
6. Put some tape around the end of the yarn and trim with scissors in order to have a nice pointy tip to thread the holes with.
7. Use a backstitch to sew around the perimeter of your design.  This will create an end-to-end stitch without any gaps.   Coming from the back, thread the tip of yarn through one hole and then through the one next to it, so that is now poking out the back.  Bring the tip of the yarn back through the original hole, so it is now in the front of the card.  This will create a nice, solid first stitch. Thread the tip through to the next empty hole and then back through the one prior.  Keep doing this the whole way around.
8. Once you complete your last stitch and the two ends of yarn are in the back of the card, tie them off with three, tight knots. 
Other design ideas:  flowers, birds, lips, candy, sunshine, a tree.  Pitch in with more ideas!

S P R E A D    S O M E    L O V E 

xo emily

hanging fruit

Bird seed cookie stars and dehydrated fruit ornaments for our trees both inside and out! Our friends Kelly and Joe visited last weekend and brought with them tree decorations that made our hearts sing.  It is by far one of my favorite holiday gifts we've ever been given and we've been ooo-ing and ahh-ing ever since they drove away. 

When I unwrapped and opened the box of oranges and pinks, I truly felt as if I was holding a box of natural jewels.  The kiwi feels and looks almost like thin glass, the orange slices are leathery, and the white of the dried pear flesh against the thin layer of its skin is perfection -- as if it was outlined with a steady hand.  Our friends made sure that each ornament hangs on a loop of wool yarn, ready for hanging.  That morning, the children placed some on our (then undecorated) Christmas tree and bundled up to hang the rest on our bare birch and maple.

My favorites: the papayas and oranges
Kelly's favorites: the star fruits and kiwis
Chick's favorite: "If we choose a favorite then Kelly and Joe might feel badly about the ones we didn't choose"
The holiday season can feel like a burst of color and love that comes and goes quickly.  When I watch these little guys swaying and dancing on the branches outside it reminds me of how far that burst of kindness and love can travel.  From Kelly and Joe's home to my eyes to Tom's eyes to our children's eyes to the tree's branches to the wind to the birds' bellies and nests wherever they might be.  It is a gift that spreads joy and love in the truest of ways.  And, I know that after the snow melts and mud season begins, we'll find little bits of Kelly's yarn in our grass, which will make me a tiny bit sad, but mostly happy. 
 
Kelly told me that she sliced her fruit thinly with a mandoline, dried them in her dehydrator, poked little holes in the top, and tied little loops of yarn through.  It would also work to dry them slowly in an oven (on low heat) or next to a wood stove or heater for a day or so.  Don't you feel like dehydrating fruit must be so simple since you always seem to find bits of dehydrated apple and pear under your kitchen table?  Or, is that just me?  Maybe I should sweep a bit more frequently.

I wish you all a happy (almost) winter weekend.

xo e


Sparkly Star Garland


 Sparkly
 Stars
 Shine

This is a super simple garland tutorial that will make your home quietly sparkle.  The glittery package paper seems to be the just-right amount of sparkle for me.  

Materials:
brown paper bag
gold or silver glitter paint (I used FolkArt Extreme Glitter)
star template (hand drawn is fine)
pencil
scissors
mini pompoms
needle
thread
glue

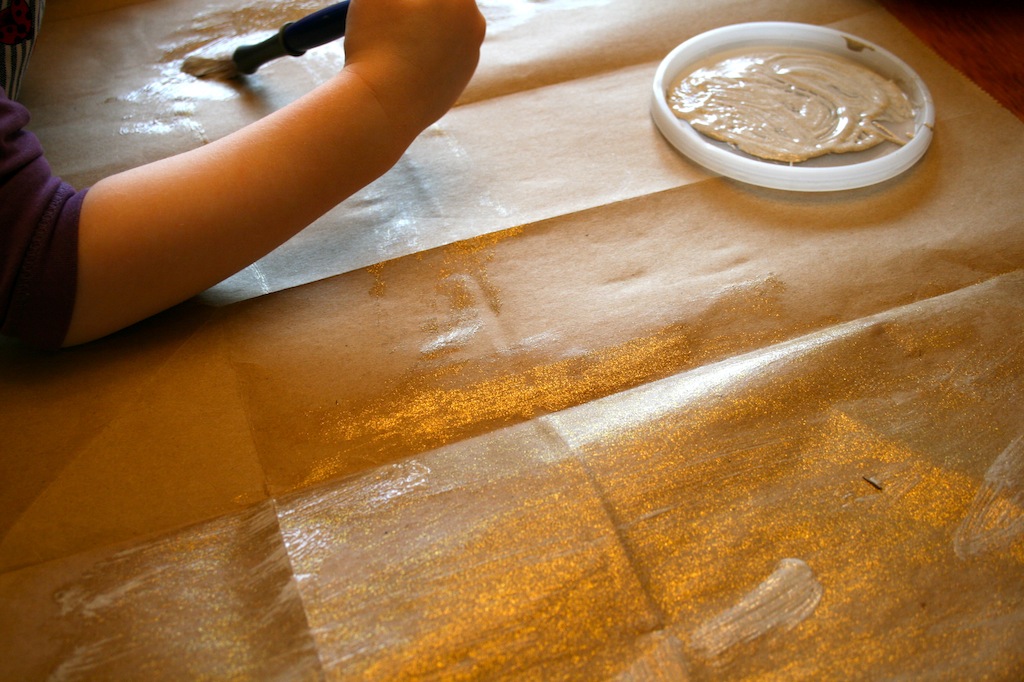
1.  Cut open the paper bag and paint the plain side with the glitter.  I used paint that just added gold glitter rather than paint that was an actual color.  This makes the glitter and color a bit more subtle, but if you are looking for something a bit more punchy, then I think gold paint would be great.  As I mentioned the other day, I was inspired by my friend Catherine's garland and she used gold paint.
It isn't everyday that Mouse gets to paint with glitter.  Fancy pants.

2.  Once it is dry, draw stars on the non-painted side, and then cut them out.
3. Gather pompoms, stars, thread and needle in preparation for stringing.
 
4. Thread the needle with thread (no need for a knot).  First thread a pompom, then a star, then another pompom.......in that order until all are threaded and you've ended with a pompom.
*Notes on threading the stars:  So they won't flip forward, thread a little bit above the center of the star.  Place the needle into the front of the star and then out through the back in order to hide the thread behind the star.

5.  Spread the garland on the floor, glitter side down, and space the stars and pompoms as you'd like them to hang.  Place tape or little dots of glue on the backsides of the stars to keep the thread in place.

We hung ours high over our fireplace and the gold stars shimmers with the light of the fire.  

Our tree is in.
Our stars are in.
Our hearts are still a little bit outside. (the bright sunshine calls to us)

xo e


m o t h e r

MotherWoman teamed up with The Nields and Sarah Prall Photography to create this beautiful tribute to mothers everywhere.  

I listened to it yesterday many times.  Sometimes, I just closed my eyes and listened to the wise lyrics and Nerissa and Katryna's sweet-sounding voices. And, other times, I payed attention to the messages and beautiful mothers and children.  It made my heart ache a little bit, but mostly I was filled with gratitude for my strong, beautiful mother who still stuffs bags of greens in my vegetable drawer.

I love the part about how the imperfections in our families and homes are the places and moments where "the light shines through."

Happy Mother's Day (one day late).  


xo e

more spring

It rained for most of the weekend, but the sun came out at the end of Sunday, and I found even more spring busting out around our home.  Sorry if you guys super sick of me documenting spring in my backyard. I can't help it.  But, first spring inside the house. 


We had an early Passover dinner at my parents' home.  There was much talk about rebirth and renewal.  And some toasting and tears for my Nanny who wasn't there.  She was kind of there, though, in a really profound way. With every single morsel of tradition, I was reminded of her smile and warm voice.  I envisioned her rocking with pride as Chick read the four questions (it is first year she could do it on her own). She would have said, "Oh! My bubbala! That was wonderful!" And, she'd tell me how proud she was of my matzo ball soup.  It was the perfect first holiday to celebrate without her because it is the one that reminds us about the continuation of life and the strength of the human spirit.   We dipped the sweet, tender greens into salty water to remind us of our tears, but not five minutes later we were toasting our sweet wine and grape juice to celebrate how far we have come.  And, how much further there is to go.


And, so there is renewal.  And, rebuilding.  There are lands to create and stories to tell. 


And, buds to gaze at


And, chives to nibble.  (The chives weren't up last weekend)


And some Magnolia tree bloom wagering. Those buds are heavy with life.  My money is on Thursday.

There is so much beauty surrounding us.

xo e