I've moved! New blog address.


My new website + blog is emilyneuburger.com.  Please visit me there!

If you have this site bookmarked in a blog reader, you'll want to switch to emilyneuburger.com.

Thanks, and see you in my new space!

xo emily

tomorrow


When Tom and I sat down with our girls to remember 2009, we quickly shot knowing glances to each other. How can we even think of our fond memories of the past year when we experienced such deep, unfathomable loss? I was instantly reminded of standing shaky beside my Tom, with broken hearts, as we grieved for the loss of our dear friend - one of his closest childhood friends. Oh, the emptiness his parents, siblings, and wife must be feeling right now. And, I was reminded of being in a sterile hospital room whispering goodbye to Tom's grandfather when just a mere two months prior, he was standing healthy and strong in our kitchen. These days, when I stare into Tom's eyes long enough, I see what he has lost, and my heart aches for him.

Yet, in the same complicated, knowing glance it was clear that we must also reflect on the blessings and joys of this past year. And, there were many.

A summary of our favorite 2009 memories

* going to the beach in Maine
* our new swing set
*Mouse learns to sing the alphabet
*Papa brews lots of beer
*Chick likes soup for the first time (hoorah!)
*Great Nanny turns 90!
*Papa begins his new job at Smith College (and loves it)
*baby Finn was born (our sweet cheeked nephew)
*playing with our big family at Grandma and Grandpa's lake house
*Chick rides a horse for the first time
*Mama began her blog on 1.1.09
*riding the ferry in the early morning hours with Nana and Gramps
*Mouse speaks in full sentences
*Chick begins to write words
*new foamy soap (made out of tea tree oil and vanilla)

We watched as Mouse danced around the room and Chick trembled with excitement when she remembered the things she loved most about the past year. And, we smiled.

In the midst of all of this reflecting, I realized that tomorrow is my blog's one year anniversary. Hoorah! Last year, on 1.1.09, I cozied up on the couch and decided to document many of my crafty experiments and pursuits. And, here I am, one year later, with a significantly weaker laptop battery and a weekly project that motivates and engages me in ways that I have never felt before. I am ever so inspired by the artful, mindful, thoughtful blogging community that I have discovered this year. Thank you to every single reader who has read, commented, asked a question, or sent me words of encouragement on this blog (or in person). Each comment and email rocks my world (except mean ones, which, luckily, I haven't experienced yet)! I'm not just saying that, guys. I LOVE hearing from you. The tips and resources and suggestions are some of the best gifts I have been given this past year. For real. And, just knowing that there are people out there reading makes me so happy.


Chick cut out the numbers 1-8. Just because. Oh, how I love that wee number 8.


Late this afternoon, we're going to a little New Year's Eve party at the home of one of Chick's classmates, and then we plan to snuggle by the fire with Indian food and a good movie. I remember days when finding something exciting to do on New Year's Eve felt really important, and I'm sure I'll return to that feeling one day. But, for now, on this cold snowy evening, having the kids tucked safely in bed and snuggling up with my love is exactly what I want to be doing when it becomes tomorrow.

Much peace to you and yours in the new year!

xo e

p r i n t i n g

In the midst of the darkest days of the year, I surprised myself and created a little bit of spring. This botanical stamp was made using an acrylic block and some $0.75 adhesive back craft foam. I drew my design onto the foam, cut out the stem and leaves, peeled the paper of the back of each piece, and fixed them onto the acrylic block. I had been thinking about this technique, and then read about it in Lena Corwin's beautiful book, "Printing by Hand." Oh boy , I love that book!

It was a simple process, which produced a beautiful print. In general, while printing with stamps, it is always a good idea to work on a solid, hard surface, but it is especially important when working with foam stamps. If the printing surface is at all raised, the excess ink on the acrylic will get all over the printing material (paper, fabric, etc.). I worked on my wood floors since it doesn't get any more solid and spacious than that. A kitchen table or desk would work just as well.

Here are some note cards that I plan to bundle into sets of 6 with envelopes.

I made a repetitive pattern at the bottom of these cotton dish towels. Perfect for last minute gift giving!


xo e

hand printed trivets

Yes, I'm giving boring old trivets away as holiday gifts. But, look! It has a pie on it! Doesn't that make up for its practicality? Plus, if someone wants to prop them up at a desk or table they'd have little prints to look at, and that is so NOT practical.

There is no tutorial to be written here. You can buy these 5 1/2" x 5 1/2" cork squares at craft or stationary stores. They are just right for trivets because of their size and because cork does a splendid job of protecting the table or counter top from scorching pots. Or, steamy pie dishes.

Just dredge your stamp in ink and press firmly with the palm of your hand. I carved the pie and bird, but any stamp in your collection will do. I'm pairing a food themed trivet with a non-food design one for a little intrigue. Two of these tied with some jute string and a little tag will make a nice gift. I think.

xo
emily

picture cards

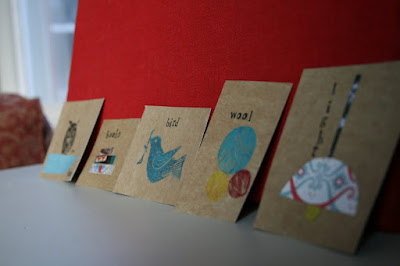
This wee sack of picture cards is one of Miss Mouse's presents for the holidays. They are perfect for collecting, telling stories, trading amongst family members, and I'm even thinking of framing a few for Mouse's room. The set has five handmade picture cards that fit snug in a little muslin drawstring bag. The cards are intentionally all slightly different in shape and size, which lends to each one's unique quality. There will be a bunch just like this set for sale in my shop on Monday the 14th, and I'll be sure to let you know here as soon as I update.

The cards are a straight-up remake project since they are made out of repurposed cardboard (cereal, cookie, tissue) boxes. I used other found materials and my hand carved stamps to create the designs. The little balls of yarn are my newest printed creations.
I made this specific set of picture cards while thinking of everyday things and creatures that Miss Mouse loves. She is a bit nervous of the dark, which is why I included a light in this set, and she is the coziest little mouse in her wool sweaters, which is why I chose the balls of yarn. I plan on making a set for Chick too.
I've been working on sets with other themes too, which means there are lots of teeny, tiny bits of paper all over my studio.

Some little bright spots in my week:
* I love Ellen's gingerbread ornament garland, and think it might be the perfect winter weekend holiday project. I never love the way gingerbread people taste, which makes me crazy about the idea of keeping them as something to look at, rather than devour.
* And, Catherine's Eggnog Cheesecake Squares sound like tasty winter sweet treats, don't they? After reading her post, I was left craving those and Frank Sinatra. I also felt like I had a little more to think about. Do you read her blog? It is the most perfect blend of funny, thoughtful, sincere, helpful, and lovely. I would be a devoted reader even if she wasn't my friend.
* I just adore my friend Ariana's set of snowbound photos. Her take on color and design makes me oh so happy.

friday! friday!

xo e

s t i t c h


I kind of knew that my almost-five-year-old daughter, who loves to layer and build and create, would love to sew. I already knew that she likes to press the foot while I sew, and thread and fabric are two of her most coveted crafting materials, so I decided to get her started with some independent stitching. Both of my wooden hoops have been acting up on me, so I needed to get her a new hoop. As I mentioned in an earlier post, our local sewing store closed its doors earlier in the season, so I was left going to Jo-Ann Fabric in search of one, and I was shocked to learn that they only sell the plastic kind now. Grump! I ended up getting her a bright yellow plastic one, but I bought a new wooden one at Purl a couple of weeks ago, and I plan on giving it to her as a winter solstice gift. I want her to experience stitching with the wooden kind too. I also bought a yard of grass green cotton jersey since I figured it would be easy to sew through, and kind of fun to touch and feel.

Amanda does a lovely job introducing this first sewing adventure in her book, The Creative Family. I first had Chick gently touch the tip of the needle because I felt that it was important for her to have a good sense of its sharpness. She was a little hesitant because she was all wrapped up in how she has been told not to play with needles for her entire life. After fifteen minutes of almost touching it, she finally did, and we quickly moved on. I threaded it with some embroidery floss and she got busy. There were a few times where she sewed over the rim of the hoop, but it was a good lesson in back stitching. Below is her masterpiece. She wanted to cut around her needle work to make an ornament of sorts. I have it hanging at the end of my hallway, so I can catch glimpses of it all day long. For me, it sweetly captures her capable, independent, beautiful almost-five-year-old little self.


xo e

snowy wrap


So far, I've bought and made a few gifts for the holiday season. And while it is nice to have those five gifts ready to go, I am so not going to wrap our gifts until the day before. But, I did wrap this one tiny gift because I wanted to share this easy snowy hill wrapping paper project. It is a simple, fun project that your kids can take part in. Chick was an expert snowflake stamper by the end of this project.

You need kraft paper or a a brown paper bag (depending on the size of the gift), white paint, a white stamp pad, a snowflake stamp, a pencil, and scissors.

Easy peasy instructions:
1. cut paper to size
2. draw a horizon line.
3. use the white paint to fill in the "hill" under the horizon line.
4. use the snowflake stamp to create the snow over the horizon line.
5. let dry and then use it to wrap your gift.


Tiny notes:

If you are going to use a big sheet for a bunch of smaller gifts, it might be nice to create a few hills, so all of the presents will have both snowy hill and snowflakes.

Ooooh, and don't you think snow people and snow forts would be nifty too?

xo e

On the Saturday after Thanksgiving, Chick, my mom, and I took the train into New York City for a little trip to SoHo. The air was crisp and appropriately cold - not like the previous 70 degree days. And, oh! the light! Since the late autumn sun is so low in the sky, there were sharp rays of light beaming down onto the city streets creating beautiful, angular shadows.

We decided to go on a city adventure because this past summer our local fabric shop closed its doors (sad, yes?), and, since then, I've been itching to see some beautiful fabric in person. I love Purl's on-line fabric shop and idea blog, so I decided we should go there first, and then we popped into Kate's Paperie to gaze at some beautiful printed paper. We meandered down Spring Street, stopping to look into store windows and to eat a faux fancy lunch where we drank our water with lemon slices out of wine goblets. I bought the above stack of fabric and sheets of paper, and my mom bought a few holiday art supply gifts for Chick and Mouse.

The train was empty for the ride home, and as I closed my eyes and listened to the clanking of the train I held Chick's hand tightly in mine. When I squinted my eyes open, I saw that her other hand was gripping her brand new train ticket as she stared at the blurry window snap shots of houses and trees. I'm pretty sure she was wondering about the children who lived in those houses. What were their parents cooking for dinner? And, did they get their medicine at that exact drug store? Just as I did when I was almost five.

I made some more felt ornaments when I returned home. I recently bought some beautiful hand dyed felt squares that were deemed "seconds," and I have fallen in love with the light, woolly gray and soft brown colors. I really do think the gray felt likes hanging around with that red stitching. They've become good friends.


xo e