I've moved! New blog address.


My new website + blog is emilyneuburger.com.  Please visit me there!

If you have this site bookmarked in a blog reader, you'll want to switch to emilyneuburger.com.

Thanks, and see you in my new space!

xo emily
Showing posts with label sewing. Show all posts

Sewing School 2: Book Review and Give-away


I was so happy to receive a copy of Amie Petronis Plumley and Andria Lisle's latest book, Sewing School 2  (Storey Publishing) in the mail, but before I could even peek at the pages, Leah (my eight-year-old) rushed off to her bedroom with it where she quickly flopped onto her bed and perused each page and project. Amie and Andria's first book, Sewing School , is one of my girl's favorites, so it came as no surprise that she would be beyond thrilled to lay eyes on the new book with exciting new projects.  Plus, its focus is teaching children to use the sewing machine, which is always an exciting prospect around these parts.

While I knew that Leah would be super excited to dig into this book, I almost forgot that my Hazel (five-years-old) is in a perfect place to begin learning to use a machine.  She loves fabric, prints, wrapping fabric around her dolls, and hand stitching, so when I showed her the book and asked if she'd like to do a project with me, she was bouncing in anticipation.

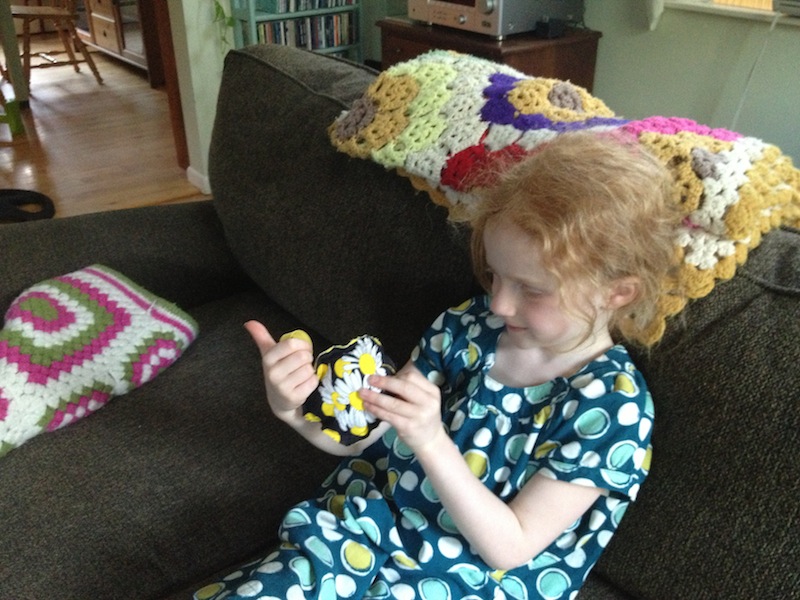
She chose the Tag Along project where you make a little stuffy with a loop for hanging.


She went right for a piece of punchy daisy fabric!


She was tentative about using the machine, but after some practice stitching, she was fired up and ready to go.  I love how the act of sewing with the machine teaches lessons in self-control and moderation.  There was a part of her that wanted to ZOOM!, but she took it slow because she was invested in her creation.

Stuffing!


Here she is, so proud of her creation!  After much consideration, this beauty will hang in her doll's bedroom.  We already have plans to make more to give away for the holidays -- we're thinking of stuffing them with herbs and flowers!
 
Sewing School 2 is a wonderful way to introduce children to sewing with a machine because it encourages them to be confident in themselves while inspiring them to be creative in ways that feel fun and productive. Plus, the projects pictured in the book are made by other children, which leaves my kids feeling inspired and connected to all of the creative possibilities within.

Visit the Sewing School blog or Storey Publishing for more information about the book and the tour.  


*********************************************************************************
Storey Publishing has generously offered to give away one copy of Sewing School 2 to a reader.  Just leave a comment on this post by 8/2 at midnight (Eastern Time) and I will announce the winner on 8/4.  Storey has requested that it be US only, please.

xo emily

Improv Sewing :: Review and Book Giveaway!

I'm excited to have the chance to share this wonderful new sewing book with you! Improv Sewing, written by Nicole Blum and Deborah Immergut  and released this past May by the amazing Storey Publishing, is a beautiful and inspiring book packed to the brim with an incredible amount of how-to information. Let's get right to it -- the focus on unfinished edges and imperfect lines speaks directly to my imperfect heart. I love how they embrace simplicity and that imperfection is seen as a beautiful stylistic choice.  This is my kind of sewing book!  It is an especially great resource for anyone who enjoys (or dreams of) transforming thrifted materials (oversized t-shirts, old sweaters, etc.) into gorgeous clothing. 

 Photograph by Alexandra Grablewski

The projects throughout are beautiful and intriguing with clear instructions and friendly little tips.  Nicole happens to be a good friend of mine, and through her,  I met the lovely Deborah.  Because I know them and their creative ways, I knew this book was going to be amazing.  And, of course, it is, but what I hadn't considered is that it would leave me feeling so set-for-life when it comes to making clothing for myself.  I really, really feel that way.  Skirts, tunics, and dresses have never felt so accessible and doable.  How beautiful is that yellow dress?  And, that girl (Nicole's daughter)?

 Photograph by Alexandra Grablewski

What I love most about and Nicole and Deborah's approach is the way they encourage readers to have confidence and to trust in their creative intuition. Yes,  it is no surprise that this way of thinking resonates with me.  I'm such a passionate believer in individual expression and remaining true to your creative instincts, which is why I love that the instructions are less about rules and more about doing what feels right.

 Photograph by Alexandra Grablewski

I feel so happy to have this sewing resource on my bookshelf where I can look to it again and again for inspiration and guidance.


Photograph by Alexandra Grablewski 

 Photograph by Alexandra Grablewski

A wee note from Storey Publishing about Improv Sewing:

Improv Sewing is about “pursuing joy, not pursuing perfection”, Blum and Immergut explain. There are no patterns to follow, and hardly any rules. The authors embrace forgiving fabrics such as knits that invite wavy hemlines and raw edges. They encourage readers to look at solid fabric as a blank canvas. With this inspirational approach to sewing, crafters at any level of experience will be confident as they create these fast, fun, and fearless projects.

The folks at Storey Publishing have generously offered to give a copy of Improv Sewing to one lucky Red Bird Crafts reader.  Simply, leave a comment on this post from now until Tuesday (6/26),  I will choose a winner using a random number generator,  and announce the winner on Wednesday (6/27).  Please be sure to leave a way for me to contact you. And, good luck!

xo e


Garden Party Bunting

This past weekend, we had a garden party birthday celebration for my mother. She turned an important number with a five in it, and we decided we needed to infuse some celebration into a year and a half that has been, at times, bumpy.
And, so there we were with the bright sun, family and friends that we adore, plentiful food and drink, and chatter that drifted into the breeze.  The day reminded me of one of my favorite books, All in a Day.  All you have is this day, this moment, and we can find our way home whenever we wish.
In order to bring color and cheer into the day, I sewed a few paper buntings to string about the yard and porch.  It is quite simple and quick to do, and they really did make the day feel extra special.

Materials:  
brown paper bags
cardstock
paint & brushes
scissors
sewing machine (or hole punch and yarn)

Step 1 : Cut the bags open and paint the inside, blank part of the bags.  Use a few different colors.
Step 2 : Make a triangle template for tracing using the cardstock.

Step 3 : Use the template to trace triangles onto the printed part of the bag, and cut out.
Step 4 : Using your sewing machine on a straight stitch, gently sew nothing for about 6 inches.  This will give you a nice, thin cord for hanging your bunting.  
Step 5 : Feed the first triangle under the foot, and sew.  Sew nothing again for 2 or so inches (adjust spacing according to your design) and then feed the next triangle under the foot. Continue until you have the completed bunting. 

Step 6 : When you are finished sewing triangles, sew nothing again for another 6 inches.  This will be the other end of the bunting.

Note : Those of you without sewing machines can use yarn and a hole punch to string your bunting!  Don't let the sewing part stop you.

Step 7 : Make loops at both ends for hanging.

This bunting will turn any old day into a fancier day.   Sometime we need that kind of transformation, yes? 


xo e


Summer Activity Board

Today's guest blogger is my lovely and talented friend, Karen Jarsky.  Karen is one of the most generous, creative, thoughtful people on the planet, and I was lucky enough to experience being a new mama at the same time as her.

One quick memory before we move onto the fun stuff: We were walking our two babes to a baby playgroup, both of them wedged into their cozy strollers when an older woman approached us with a misty, nostalgic gaze in her eyes.  She forced a dollar into each of our hands, and said it was for them - the two friends.  I remember knowing that her gesture would stick with me. Not because it was strange and quirky, but because she seemed to know something about how precious and fleeting that time would be.  And, how lucky we were.

Check out this amazing Summer Activity Board (and tutorial) that Karen made for me and my family:

When I think of summer, I think of bright sunshine, a dip in the kiddie pool, and maybe some fresh lemonade. And now that I have a six-year-old, I also think of a seemingly endless string of days where I wake up and ask myself, “What are we going to do today?” Don’t get me wrong; I have ideas. But my ideas come to me at the most random times, and later, when I need an idea for a gorgeous 75-degree day or a gloomy day full of rainclouds and puddles, I can’t for the life of me remember a single one.

I’m a list person. The only thing I like more than making a list is crossing something off of it. So you’d think I’d just write down my ideas and keep a handy list that I could pull out of my back pocket whenever the need presented itself. But that would be too easy! Too obvious! And maybe even a little boring! So instead I decided put together a creative space for my family to keep track of all of our summer plans—a Summer Board—and since the creating was so much fun, Emily thought you all might have some fun with the idea too.


Basically, it’s a board. A board with pockets. And each pocket is a cozy little place to stash your summer ideas. And just to keep things organized, each pocket has a place for the things you’d like to do and another for the things you’ve already done.

I should mention that I am not the first person to do something like this. This time of year, a quick Google search will show you all sorts of ways to keep track of your ice cream eating, miniature golf playing, sea glass hunting plans. My own board was inspired by another that I saw two years ago on the Craft site. Theirs is much more complex--more than I needed for our family--but one look at those pockets with future and past tense and I was instantly in love. I took the idea in the direction that made me the happiest, and now maybe you can use this one to spark your own version.

Here’s what you’ll need:
One large fabric scrap, about 18”x18”
8 fabric squares, about 3.5”x3.5” each
One 4-inch scrap of ribbon or string
Any other embellishments you’d like
One piece of Homasote board, about 12.5”x14.5”
Hardware for hanging (including a 5/8” machine screw, nut, washer, and hanging ring)
A supply of craft sticks

You’ll also want to have handy:
Sewing Machine
Scissors
Pinking Shears
Ruler
Staple Gun and Staples (or Glue Gun)

Step One: Think about your plans
This part of the project isn’t so much crafty as it is thought-provoking. Take a few minutes and think about the kinds of things your family likes to do. For my board, I included the following:
•    Make/Made
•    See/Saw (How can you not smile when you read that?)
•    Play/Played
•    Eat/Ate (Great for picky eaters! So far my family has “new ice cream flavor” in this to-do pocket.)
•    Do/Did
•    Go/Went
•    Read/Read
•    And then one wider pocket in the middle for blank sticks, labeled “possibility.”

Your family might do other things that don’t easily fall into these categories… Do you build? Do you hike? Do you volunteer? It’s important to think through your pockets now, since it will affect how many pockets you create and, as a result, how large your finished product is. To keep things simple, let’s assume that you’re going to include eight pockets, just like me. 

Step Two: Choose your materials
This is the perfect time to dig into your fabric stash if you have one. You’ll need one piece of fabric for your background that is about 18x18—conveniently, almost the exact size of a fat quarter.

The only important thing about the size of this piece of fabric is that it be big enough to hold all of the pockets that you want to add. The only thing important about how this piece of fabric looks is that you love it. I chose something from my vintage stash.

Once you’ve decided on your background fabric, you’ll need to choose something for the pockets. I knew I wanted to go a little funky with my pocket fabric because the gray plaid background was so subdued—not at all like summer should be! I had received a charm pack of the new Moda line from Oliver+S. It contained a stack of tiny squares of gorgeous, colorful fabric—the perfect contrast to my nearly-solid background.


Unfortunately, my Oliver+S squares were too small to be pockets on their own, so I dug into my stash a little further and found some scraps from a canvas drop cloth I’d picked up at my local home improvement store. (Quick aside: drop cloths are fantastic if you need a large piece of neutral fabric. And the scraps come in handy too!) I cut eight 3.5”x3.5” squares from the drop cloth fabric—one for each pocket.

Step Three: Label your pockets
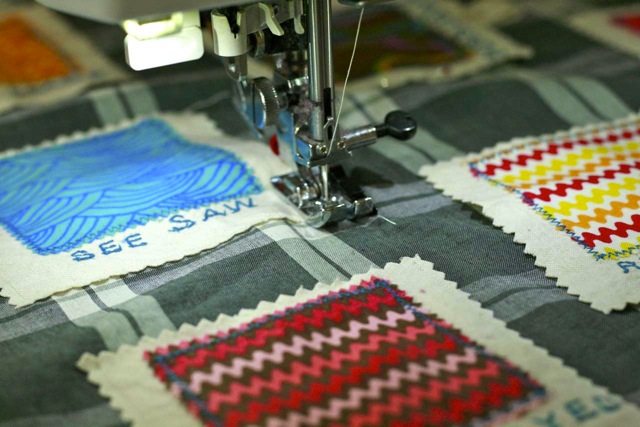
There are lots of ways to complete this step. My sewing machine happens to have alphabet stitches, so I sewed the words on to the fabric. You could also use rubber stamps, or even a fabric pen to hand write them. At this step, my drop cloth background comes in handy because the words show up better on ivory than they would on the bold prints. If I had been using just the prints, I might have sewn the words onto a neutral color ribbon, and then attached that to each pocket.


Remember to leave at least a half inch under your words so you have space to stitch the pocket to the background. This is the point where I attached my smaller colorful squares to the drop cloth squares with a quick zigzag stitch. Here is where you (or you and your kids) can embellish your own pockets.

Step Four: Trim your pockets
Now it’s time to pull out your pinking shears and trim the edges of your squares so they won’t fray. Why didn’t you just cut them out with the pinking shears in the first place? Because I like to leave a little room for error, and trimming the square later is an opportunity to make adjustments if the words aren’t as straight as you’d like them, for example.

You can trim off as much as you’d like. You’ll just want to make sure that your pockets stay deep enough to comfortably support the craft sticks and wide enough to accommodate all the summer fun you’re going to be stashing in there. I only trimmed the slightest amount, so my pockets are probably about 3.25x3.25 inches after trimming.

Step Five: Place your pockets
Now you need to place the pockets on the background fabric. There’s no right or wrong way to do any step of this project, and for this step, that’s especially true. My pockets are placed in straight lines, but my plaid background gave me handy gridlines for placement. Don’t spend too much time trying to get your placement “perfect” in any way. The point is to get out and have fun this summer, not make yourself crazy with your ruler! The important thing here is to leave yourself a margin of about 3 inches around the entire background fabric so that you can attach it to the board later.

Once you have your pockets where you want them, pin them in place, and then grab your 4” ribbon scrap. You’re going to fold that in half and tuck the cut ends under one edge of whichever pocket will hold the blank sticks. Insert the raw edges at least one-half inch under the pocket so your stitching will easily catch it. This is your pen holder.

Now that everything is where you want it, stitch the bottom and both sides of each pocket, somewhere between a quarter and an eighth of an inch from the edge. You want to make sure you’re stitching far enough in that you’re solidly catching the full edge of the pocket, but not so far that you cut excessively into the size of the pocket. I like to stitch the bottom first, just to anchor it into place, and then I move to the sides. Remember not to stitch the top shut! (Not that I almost did that. Heh.)


Your last sewing step is to divide each pocket (except for the one that will hold blank sticks) in half. You can just eyeball this, or draw a straight chalk line to follow. Stitch all the way from the top to the bottom, between your two words. If the dividing line isn’t exactly in the center of the pocket, that’s fine! There’s still room for your sticks, right? Right.


Step Six: Prepare your board
Now you need something to turn this from a piece of fabric into a board. I’ve suggested Homasote, which is available at lumber yards and apparently Home Depot (though I’ve never purchased it there). It’s a soundproofing material, but it’s also an excellent bulletin board material. I like it for this project because it will allow you to attach coupons or tickets to the board with a push pin if you want to. It’s also a nice thickness and weight—it feels substantial, but not too heavy.

Here’s the drawback: Homasote is sold in 8’x4’ sheets. I’ve heard rumors of 4’x4’ sheets, but I’ve never seen them. So, if you buy it just for this project you’ll have a LOT left over. But if you do, you also might get addicted to covering it with fabric and hanging it all over your house like I have. But, if you’re not looking to surround yourself with Homasote, you can use foam core, or even the backing of a picture frame (which, with the frame, will give you an even more finished, formal look when you’re done). And I know Emily wouldn’t object if you pulled a cereal box out of the recycling bin and used that instead.

If you do use Homasote and you purchase it at a lumber yard, you can ask them to cut it into a few small pieces so you can fit it in your car. Once you’re home, drag a utility knife over the line you want to cut over and over and over in order to cut it down to size. You may have to come at it from the front and the back.

My board is 12.5” wide and 14.5” high. I actually waited to cut it until the sewing was done so I could size it according to my finished fabric, but if you’re working with a scrap or any board with limited dimensions, you’ll want to do the reverse, and base your fabric measurements (in Step Two) on your board’s dimensions instead.


I’ve tried a few ways of hanging Homasote boards over the years, but I find that the sturdiest involves what my hardware store calls “mirror hardware.” As you can see in the photo, it’s an easy way to attach hanging hardware through the entire board so that it won’t budge.


To prepare the board, locate a spot that’s a few inches from the top and exactly at the horizontal midpoint and drill a small hole. (I was a little too lazy to pull out the drill, and I actually just used a chunky nail to make my pilot hole. Worked just fine.) Insert the screw (which is threaded through the hook and the washer) through the board. Attach the nut on the other side.


The length of the screw is important here, because you want it to be as short as possible, but still long enough to go through and catch the nut. Mine is 5/8” long (measured from the very top to the very bottom) and it’s a perfect fit. There’s just a tiny little nub on the front of the board (and it’s behind a pocket anyway, so you’d never know it).


Next, lay your fabric face down and make a mental note of the where the lowest stitching line falls. You can line up the bottom of your board with this line. Once you have the board in place, grab your staple gun. You’re going to fold the edges of the fabric to the back of the board and staple them in place. Fold the raw edge of the fabric under for a more finished look.


I like to do a few staples across the bottom first and then flip over the board to make sure things are straight and centered.  Make any adjustments that you need to, and then continue stapling, pulling the fabric taut as you go. I’ve used a regular stapler for this step before and it seems to do just fine. If you’ve chosen something other than Homasote for your board, you might consider using a glue gun rather than a staple gun. Use your best judgment.

Step Seven: Make your plans
As your final step, grab a handful of craft sticks (pretty readily available at craft and dollar stores) and sit down with your family and brainstorm about what you’d like to do in the next two months. Put each stick in the appropriate pocket and, once you’ve done it/eaten it/read it/seen it/built it/etc., move the stick over to the other side.


I like to keep a supply of sticks handy on my desk, in the kitchen, wherever ideas might come to me. Because remember: if you don’t write them down, they’ll be just like summer: gone before you know it. Have fun!

* All photos by Karen Jarsky

Karen Jarsky doesn't have a blog but is constantly amazed by and grateful for the things she can learn from other sewists and crafters who take the time to share ideas and advice on theirs. Karen will try sewing anything once, and sells some of her creations in her Etsy shop, Peanut and Beans.

stitch-a-bird

This spring I've been spending time drawing with my  non-dominant hand.   This technique has produced lots of wobbly leaves, spindly stems, and skinny crooked houses.  As it turns out, this sort of thing is perfect material for storytelling.  The kids and I have been using our drawings to tell imaginative outside tales.  The other day, as I was settling down for a tiny afternoon nap, my eyes were closed and a yellow, stitched bird came to me.  And, so, the next day, I made it.   I think it would be  a nice start to a set of story telling cards.

Using my sewing machine as a drawing utensil gives my illustrations a airy, curious quality, which I quite like.

With pencil, lightly draw a shape (I drew the bird) onto watercolor paper.


Use your sewing machine to follow your pencil lines.  Don't worry about being too careful and perfect.  Erase your pencil lines, and then tie off the ends of the thread on the back and use a very thin layer of glue to secure. Once dry, fill in your drawing with watercolors.

Oh, and it is kind of like my sew-a-sprout tutorial from last spring.

taaa weeeeeeeeet. tweet. tweet. tweet.  (says the blue jay living in the bush outside my study)

xo e

rings and things :: a valentine's day tutorial


We are making rings and things for Valentine's Day this year: heart button rings, wool felt heart rings, heart button hair ties, and some bracelets too.

A pile of little wooden hearts with a fresh coat of paint.

Chick is partial to the wooden button heart ring.

Mouse loves the soft, wool felt ring. This is more of that earthy, soft, thick, locally dyed wool that I picked up while I was selling at a local craft fair this past fall.

The hair tie in action.

And, Chick's favorite: the heart button bracelet. I snipped a hair tie elastic, threaded it through, and then tied it, so is just the right size.


This is my 1980's hand-in-the pocket shot. It almost looks like I am wearing stone washed jeans, right?

How to:

Materials: paint, wooden hearts (wood section in your local craft store), black 1/4" flat elastic, scissors, thread, wool felt, elastic hair ties, and a drill.


After painting the little hearts, drill holes in them to make them into heart shaped buttons. The size of the holes depends on what you wish to do with them. Tiny holes are perfect for sewing them onto the black ring elastic, and larger holes are better for threading hair tie elastic through.

Make the elastic rings. Measure little fingers and snip off a piece of flat elastic. While sewing the elastic into a ring, use a slightly larger piece with some overlap, and then snip off any part that hangs over.

Once you have a bunch of black elastic rings, sew wooden hearts, felt hearts, or whatever you want onto the rings. We are planning to have a little ring decorating afternoon where Chick and Mouse will help design rings and things. I bought a bag of tiny paper flowers too, and the kids loved how those turned out. I'll show you pictures of those in another post.

I did all of the sewing for this project, but I do plan on having the kids use some glue to decorate some rings on their own.

xo e

winter trees

This wee tee is the newest addition to my shop. It is kickin' it with a few other friends like the truckin' and the soaring bird shirts.

I'm feeling happy about a quiet, cozy weekend with a visit from two of our closest friends. I think we'll bring a tree home, put up some twinkle lights, and hang ornaments. Oh, and I can't forget the annual gingerbread decorating extravaganza at another dear friend's home where I will get to nibble on spice drops and licorice with a room full of lovelies. Tom made a gingerbread bird house last year and another friend made a two story duplex. This is the big leagues, people.

Happy almost weekend.

xo

deer shirt

Hello dear ones -

Or, should I have said, "Hello deer ones ?" Har, har, har.

But, seriously. This perky deer is one of the designs in my new line of kids shirts, and you can find it here.

Each deer is hand printed onto a square of high quality 100% cotton muslin, and then the square is appliqued with bright green thread. I feel really happy with how the dark gray shirt carries the creamy muslin print, and I am pleased that the grass green thread seems to tie it all together. I had originally considered a more deconstructed, frayed look around the edges, but I ended up feeling like the zig zag stitching looks the best.

xo e

the happy garland


In the midst of doing all that I do, I've been practicing being mindful and present in whatever moment I find myself in. This practice isn't so much about apple juice spills on the floor being viewed as splendid play as it is about focusing on all that I have rather than on all that might be. Think: less what-ifs and more look-at-what-I-have-right-nows. This is where the happy banner comes in handy. With its simple images of woodland creatures and a cheery home, the garland serves as a clean slate, a reminder not to get too deep in it. When I feel the what-ifs coming on, I've taken to looking at this string of cheer, and it makes me smile.


And so, I whipped up a whole bunch of them because the more cheer the better, right? I used soft Kona cotton (in turquoise and tomato red too) for the base, earthy muslin for the flags, and my little block prints with black ink on the flags.

What else? Miss Mouse has taken to saying "whoopsie daisy" when she drops something and Chick is writing sentences where she spells the number six like this: seks. They kill me.

I am thankful for all that I have.

xo e

wee birdie shirts


My today consisted of playing with Mouse and sewing shirts for the craft fair season, which, for me, begins next weekend. I'll be selling my wares at The Hartsbrook Fair on *11.20 and at The Crafty Rumpus on 12.4. Hoorah!


In the next week or so, I'll be stocking my shop with some of these new t-shirt designs, and I'll be sure to let you know here when I do.

A little off topic, but does anyone else feel tense when huge groups of geese are flying overhead in the wrong direction? I saw a bunch flying north this morning, and I had an incredible desire to redirect them traffic cop style. Then I relaxed, and enjoyed watching their sleek hourglass shapes gliding through the sky.

Happy weekend.
xox e

* I originally wrote the wrong date. The Hartsbrook Fair is this Saturday (11.20). Thanks, dear Katie.