

Today's guest blogger is my lovely and talented friend, Karen Jarsky. Karen is one of the most generous, creative, thoughtful people on the planet, and I was lucky enough to experience being a new mama at the same time as her.
One quick memory before we move onto the fun stuff: We were walking our two babes to a baby playgroup, both of them wedged into their cozy strollers when an older woman approached us with a misty, nostalgic gaze in her eyes. She forced a dollar into each of our hands, and said it was for them - the two friends. I remember knowing that her gesture would stick with me. Not because it was strange and quirky, but because she seemed to know something about how precious and fleeting that time would be. And, how lucky we were.
Check out this amazing Summer Activity Board (and tutorial) that Karen made for me and my family:

When I think of summer, I think of bright sunshine, a dip in the kiddie pool, and maybe some fresh lemonade. And now that I have a six-year-old, I also think of a seemingly endless string of days where I wake up and ask myself, “What are we going to do today?” Don’t get me wrong; I have ideas. But my ideas come to me at the most random times, and later, when I need an idea for a gorgeous 75-degree day or a gloomy day full of rainclouds and puddles, I can’t for the life of me remember a single one.
I’m a list person. The only thing I like more than making a list is crossing something off of it. So you’d think I’d just write down my ideas and keep a handy list that I could pull out of my back pocket whenever the need presented itself. But that would be too easy! Too obvious! And maybe even a little boring! So instead I decided put together a creative space for my family to keep track of all of our summer plans—a Summer Board—and since the creating was so much fun, Emily thought you all might have some fun with the idea too.
Basically, it’s a board. A board with pockets. And each pocket is a cozy little place to stash your summer ideas. And just to keep things organized, each pocket has a place for the things you’d like to do and another for the things you’ve already done.
I should mention that I am not the first person to do something like this. This time of year, a quick Google search will show you all sorts of ways to keep track of your ice cream eating, miniature golf playing, sea glass hunting plans. My own board was inspired by another that I saw two years ago on the Craft site. Theirs is much more complex--more than I needed for our family--but one look at those pockets with future and past tense and I was instantly in love. I took the idea in the direction that made me the happiest, and now maybe you can use this one to spark your own version.
Here’s what you’ll need:
One large fabric scrap, about 18”x18”
8 fabric squares, about 3.5”x3.5” each
One 4-inch scrap of ribbon or string
Any other embellishments you’d like
One piece of Homasote board, about 12.5”x14.5”
Hardware for hanging (including a 5/8” machine screw, nut, washer, and hanging ring)
A supply of craft sticks
You’ll also want to have handy:
Sewing Machine
Scissors
Pinking Shears
Ruler
Staple Gun and Staples (or Glue Gun)
Step One: Think about your plans
This part of the project isn’t so much crafty as it is thought-provoking. Take a few minutes and think about the kinds of things your family likes to do. For my board, I included the following:
• Make/Made
• See/Saw (How can you not smile when you read that?)
• Play/Played
• Eat/Ate (Great for picky eaters! So far my family has “new ice cream flavor” in this to-do pocket.)
• Do/Did
• Go/Went
• Read/Read
• And then one wider pocket in the middle for blank sticks, labeled “possibility.”
Your family might do other things that don’t easily fall into these categories… Do you build? Do you hike? Do you volunteer? It’s important to think through your pockets now, since it will affect how many pockets you create and, as a result, how large your finished product is. To keep things simple, let’s assume that you’re going to include eight pockets, just like me.
Step Two: Choose your materials
This is the perfect time to dig into your fabric stash if you have one. You’ll need one piece of fabric for your background that is about 18x18—conveniently, almost the exact size of a fat quarter.
The only important thing about the size of this piece of fabric is that it be big enough to hold all of the pockets that you want to add. The only thing important about how this piece of fabric looks is that you love it. I chose something from my vintage stash.
Once you’ve decided on your background fabric, you’ll need to choose something for the pockets. I knew I wanted to go a little funky with my pocket fabric because the gray plaid background was so subdued—not at all like summer should be! I had received a charm pack of the new Moda line from Oliver+S. It contained a stack of tiny squares of gorgeous, colorful fabric—the perfect contrast to my nearly-solid background.


Unfortunately, my Oliver+S squares were too small to be pockets on their own, so I dug into my stash a little further and found some scraps from a canvas drop cloth I’d picked up at my local home improvement store. (Quick aside: drop cloths are fantastic if you need a large piece of neutral fabric. And the scraps come in handy too!) I cut eight 3.5”x3.5” squares from the drop cloth fabric—one for each pocket.
Step Three: Label your pockets
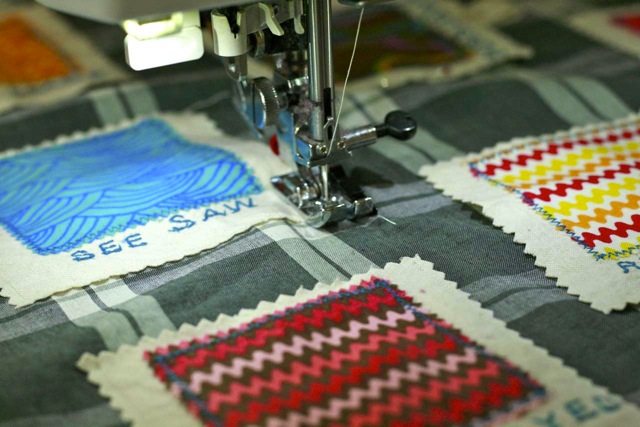
There are lots of ways to complete this step. My sewing machine happens to have alphabet stitches, so I sewed the words on to the fabric. You could also use rubber stamps, or even a fabric pen to hand write them. At this step, my drop cloth background comes in handy because the words show up better on ivory than they would on the bold prints. If I had been using just the prints, I might have sewn the words onto a neutral color ribbon, and then attached that to each pocket.

Remember to leave at least a half inch under your words so you have space to stitch the pocket to the background. This is the point where I attached my smaller colorful squares to the drop cloth squares with a quick zigzag stitch. Here is where you (or you and your kids) can embellish your own pockets.
Step Four: Trim your pockets
Now it’s time to pull out your pinking shears and trim the edges of your squares so they won’t fray. Why didn’t you just cut them out with the pinking shears in the first place? Because I like to leave a little room for error, and trimming the square later is an opportunity to make adjustments if the words aren’t as straight as you’d like them, for example.

You can trim off as much as you’d like. You’ll just want to make sure that your pockets stay deep enough to comfortably support the craft sticks and wide enough to accommodate all the summer fun you’re going to be stashing in there. I only trimmed the slightest amount, so my pockets are probably about 3.25x3.25 inches after trimming.
Step Five: Place your pockets
Now you need to place the pockets on the background fabric. There’s no right or wrong way to do any step of this project, and for this step, that’s especially true. My pockets are placed in straight lines, but my plaid background gave me handy gridlines for placement. Don’t spend too much time trying to get your placement “perfect” in any way. The point is to get out and have fun this summer, not make yourself crazy with your ruler! The important thing here is to leave yourself a margin of about 3 inches around the entire background fabric so that you can attach it to the board later.
Once you have your pockets where you want them, pin them in place, and then grab your 4” ribbon scrap. You’re going to fold that in half and tuck the cut ends under one edge of whichever pocket will hold the blank sticks. Insert the raw edges at least one-half inch under the pocket so your stitching will easily catch it. This is your pen holder.

Now that everything is where you want it, stitch the bottom and both sides of each pocket, somewhere between a quarter and an eighth of an inch from the edge. You want to make sure you’re stitching far enough in that you’re solidly catching the full edge of the pocket, but not so far that you cut excessively into the size of the pocket. I like to stitch the bottom first, just to anchor it into place, and then I move to the sides. Remember not to stitch the top shut! (Not that I almost did that. Heh.)

Your last sewing step is to divide each pocket (except for the one that will hold blank sticks) in half. You can just eyeball this, or draw a straight chalk line to follow. Stitch all the way from the top to the bottom, between your two words. If the dividing line isn’t exactly in the center of the pocket, that’s fine! There’s still room for your sticks, right? Right.


Step Six: Prepare your board
Now you need something to turn this from a piece of fabric into a board. I’ve suggested Homasote, which is available at lumber yards and apparently Home Depot (though I’ve never purchased it there). It’s a soundproofing material, but it’s also an excellent bulletin board material. I like it for this project because it will allow you to attach coupons or tickets to the board with a push pin if you want to. It’s also a nice thickness and weight—it feels substantial, but not too heavy.
Here’s the drawback: Homasote is sold in 8’x4’ sheets. I’ve heard rumors of 4’x4’ sheets, but I’ve never seen them. So, if you buy it just for this project you’ll have a LOT left over. But if you do, you also might get addicted to covering it with fabric and hanging it all over your house like I have. But, if you’re not looking to surround yourself with Homasote, you can use foam core, or even the backing of a picture frame (which, with the frame, will give you an even more finished, formal look when you’re done). And I know Emily wouldn’t object if you pulled a cereal box out of the recycling bin and used that instead.
If you do use Homasote and you purchase it at a lumber yard, you can ask them to cut it into a few small pieces so you can fit it in your car. Once you’re home, drag a utility knife over the line you want to cut over and over and over in order to cut it down to size. You may have to come at it from the front and the back.
My board is 12.5” wide and 14.5” high. I actually waited to cut it until the sewing was done so I could size it according to my finished fabric, but if you’re working with a scrap or any board with limited dimensions, you’ll want to do the reverse, and base your fabric measurements (in Step Two) on your board’s dimensions instead.

I’ve tried a few ways of hanging Homasote boards over the years, but I find that the sturdiest involves what my hardware store calls “mirror hardware.” As you can see in the photo, it’s an easy way to attach hanging hardware through the entire board so that it won’t budge.

To prepare the board, locate a spot that’s a few inches from the top and exactly at the horizontal midpoint and drill a small hole. (I was a little too lazy to pull out the drill, and I actually just used a chunky nail to make my pilot hole. Worked just fine.) Insert the screw (which is threaded through the hook and the washer) through the board. Attach the nut on the other side.

The length of the screw is important here, because you want it to be as short as possible, but still long enough to go through and catch the nut. Mine is 5/8” long (measured from the very top to the very bottom) and it’s a perfect fit. There’s just a tiny little nub on the front of the board (and it’s behind a pocket anyway, so you’d never know it).
Next, lay your fabric face down and make a mental note of the where the lowest stitching line falls. You can line up the bottom of your board with this line. Once you have the board in place, grab your staple gun. You’re going to fold the edges of the fabric to the back of the board and staple them in place. Fold the raw edge of the fabric under for a more finished look.

I like to do a few staples across the bottom first and then flip over the board to make sure things are straight and centered. Make any adjustments that you need to, and then continue stapling, pulling the fabric taut as you go. I’ve used a regular stapler for this step before and it seems to do just fine. If you’ve chosen something other than Homasote for your board, you might consider using a glue gun rather than a staple gun. Use your best judgment.
Step Seven: Make your plans
As your final step, grab a handful of craft sticks (pretty readily available at craft and dollar stores) and sit down with your family and brainstorm about what you’d like to do in the next two months. Put each stick in the appropriate pocket and, once you’ve done it/eaten it/read it/seen it/built it/etc., move the stick over to the other side.

I like to keep a supply of sticks handy on my desk, in the kitchen, wherever ideas might come to me. Because remember: if you don’t write them down, they’ll be just like summer: gone before you know it. Have fun!
* All photos by Karen Jarsky
Karen Jarsky doesn't have a blog but is constantly amazed by and grateful for the things she can learn from other sewists and crafters who take the time to share ideas and advice on theirs. Karen will try sewing anything once, and sells some of her creations in her Etsy shop, Peanut and Beans.
One quick memory before we move onto the fun stuff: We were walking our two babes to a baby playgroup, both of them wedged into their cozy strollers when an older woman approached us with a misty, nostalgic gaze in her eyes. She forced a dollar into each of our hands, and said it was for them - the two friends. I remember knowing that her gesture would stick with me. Not because it was strange and quirky, but because she seemed to know something about how precious and fleeting that time would be. And, how lucky we were.
Check out this amazing Summer Activity Board (and tutorial) that Karen made for me and my family:

When I think of summer, I think of bright sunshine, a dip in the kiddie pool, and maybe some fresh lemonade. And now that I have a six-year-old, I also think of a seemingly endless string of days where I wake up and ask myself, “What are we going to do today?” Don’t get me wrong; I have ideas. But my ideas come to me at the most random times, and later, when I need an idea for a gorgeous 75-degree day or a gloomy day full of rainclouds and puddles, I can’t for the life of me remember a single one.
I’m a list person. The only thing I like more than making a list is crossing something off of it. So you’d think I’d just write down my ideas and keep a handy list that I could pull out of my back pocket whenever the need presented itself. But that would be too easy! Too obvious! And maybe even a little boring! So instead I decided put together a creative space for my family to keep track of all of our summer plans—a Summer Board—and since the creating was so much fun, Emily thought you all might have some fun with the idea too.
Basically, it’s a board. A board with pockets. And each pocket is a cozy little place to stash your summer ideas. And just to keep things organized, each pocket has a place for the things you’d like to do and another for the things you’ve already done.
I should mention that I am not the first person to do something like this. This time of year, a quick Google search will show you all sorts of ways to keep track of your ice cream eating, miniature golf playing, sea glass hunting plans. My own board was inspired by another that I saw two years ago on the Craft site. Theirs is much more complex--more than I needed for our family--but one look at those pockets with future and past tense and I was instantly in love. I took the idea in the direction that made me the happiest, and now maybe you can use this one to spark your own version.
Here’s what you’ll need:
One large fabric scrap, about 18”x18”
8 fabric squares, about 3.5”x3.5” each
One 4-inch scrap of ribbon or string
Any other embellishments you’d like
One piece of Homasote board, about 12.5”x14.5”
Hardware for hanging (including a 5/8” machine screw, nut, washer, and hanging ring)
A supply of craft sticks
You’ll also want to have handy:
Sewing Machine
Scissors
Pinking Shears
Ruler
Staple Gun and Staples (or Glue Gun)
Step One: Think about your plans
This part of the project isn’t so much crafty as it is thought-provoking. Take a few minutes and think about the kinds of things your family likes to do. For my board, I included the following:
• Make/Made
• See/Saw (How can you not smile when you read that?)
• Play/Played
• Eat/Ate (Great for picky eaters! So far my family has “new ice cream flavor” in this to-do pocket.)
• Do/Did
• Go/Went
• Read/Read
• And then one wider pocket in the middle for blank sticks, labeled “possibility.”
Your family might do other things that don’t easily fall into these categories… Do you build? Do you hike? Do you volunteer? It’s important to think through your pockets now, since it will affect how many pockets you create and, as a result, how large your finished product is. To keep things simple, let’s assume that you’re going to include eight pockets, just like me.
Step Two: Choose your materials
This is the perfect time to dig into your fabric stash if you have one. You’ll need one piece of fabric for your background that is about 18x18—conveniently, almost the exact size of a fat quarter.
The only important thing about the size of this piece of fabric is that it be big enough to hold all of the pockets that you want to add. The only thing important about how this piece of fabric looks is that you love it. I chose something from my vintage stash.
Once you’ve decided on your background fabric, you’ll need to choose something for the pockets. I knew I wanted to go a little funky with my pocket fabric because the gray plaid background was so subdued—not at all like summer should be! I had received a charm pack of the new Moda line from Oliver+S. It contained a stack of tiny squares of gorgeous, colorful fabric—the perfect contrast to my nearly-solid background.


Unfortunately, my Oliver+S squares were too small to be pockets on their own, so I dug into my stash a little further and found some scraps from a canvas drop cloth I’d picked up at my local home improvement store. (Quick aside: drop cloths are fantastic if you need a large piece of neutral fabric. And the scraps come in handy too!) I cut eight 3.5”x3.5” squares from the drop cloth fabric—one for each pocket.
Step Three: Label your pockets
There are lots of ways to complete this step. My sewing machine happens to have alphabet stitches, so I sewed the words on to the fabric. You could also use rubber stamps, or even a fabric pen to hand write them. At this step, my drop cloth background comes in handy because the words show up better on ivory than they would on the bold prints. If I had been using just the prints, I might have sewn the words onto a neutral color ribbon, and then attached that to each pocket.

Remember to leave at least a half inch under your words so you have space to stitch the pocket to the background. This is the point where I attached my smaller colorful squares to the drop cloth squares with a quick zigzag stitch. Here is where you (or you and your kids) can embellish your own pockets.
Step Four: Trim your pockets
Now it’s time to pull out your pinking shears and trim the edges of your squares so they won’t fray. Why didn’t you just cut them out with the pinking shears in the first place? Because I like to leave a little room for error, and trimming the square later is an opportunity to make adjustments if the words aren’t as straight as you’d like them, for example.

You can trim off as much as you’d like. You’ll just want to make sure that your pockets stay deep enough to comfortably support the craft sticks and wide enough to accommodate all the summer fun you’re going to be stashing in there. I only trimmed the slightest amount, so my pockets are probably about 3.25x3.25 inches after trimming.
Step Five: Place your pockets
Now you need to place the pockets on the background fabric. There’s no right or wrong way to do any step of this project, and for this step, that’s especially true. My pockets are placed in straight lines, but my plaid background gave me handy gridlines for placement. Don’t spend too much time trying to get your placement “perfect” in any way. The point is to get out and have fun this summer, not make yourself crazy with your ruler! The important thing here is to leave yourself a margin of about 3 inches around the entire background fabric so that you can attach it to the board later.
Once you have your pockets where you want them, pin them in place, and then grab your 4” ribbon scrap. You’re going to fold that in half and tuck the cut ends under one edge of whichever pocket will hold the blank sticks. Insert the raw edges at least one-half inch under the pocket so your stitching will easily catch it. This is your pen holder.

Now that everything is where you want it, stitch the bottom and both sides of each pocket, somewhere between a quarter and an eighth of an inch from the edge. You want to make sure you’re stitching far enough in that you’re solidly catching the full edge of the pocket, but not so far that you cut excessively into the size of the pocket. I like to stitch the bottom first, just to anchor it into place, and then I move to the sides. Remember not to stitch the top shut! (Not that I almost did that. Heh.)
Your last sewing step is to divide each pocket (except for the one that will hold blank sticks) in half. You can just eyeball this, or draw a straight chalk line to follow. Stitch all the way from the top to the bottom, between your two words. If the dividing line isn’t exactly in the center of the pocket, that’s fine! There’s still room for your sticks, right? Right.


Step Six: Prepare your board
Now you need something to turn this from a piece of fabric into a board. I’ve suggested Homasote, which is available at lumber yards and apparently Home Depot (though I’ve never purchased it there). It’s a soundproofing material, but it’s also an excellent bulletin board material. I like it for this project because it will allow you to attach coupons or tickets to the board with a push pin if you want to. It’s also a nice thickness and weight—it feels substantial, but not too heavy.
Here’s the drawback: Homasote is sold in 8’x4’ sheets. I’ve heard rumors of 4’x4’ sheets, but I’ve never seen them. So, if you buy it just for this project you’ll have a LOT left over. But if you do, you also might get addicted to covering it with fabric and hanging it all over your house like I have. But, if you’re not looking to surround yourself with Homasote, you can use foam core, or even the backing of a picture frame (which, with the frame, will give you an even more finished, formal look when you’re done). And I know Emily wouldn’t object if you pulled a cereal box out of the recycling bin and used that instead.
If you do use Homasote and you purchase it at a lumber yard, you can ask them to cut it into a few small pieces so you can fit it in your car. Once you’re home, drag a utility knife over the line you want to cut over and over and over in order to cut it down to size. You may have to come at it from the front and the back.
My board is 12.5” wide and 14.5” high. I actually waited to cut it until the sewing was done so I could size it according to my finished fabric, but if you’re working with a scrap or any board with limited dimensions, you’ll want to do the reverse, and base your fabric measurements (in Step Two) on your board’s dimensions instead.

I’ve tried a few ways of hanging Homasote boards over the years, but I find that the sturdiest involves what my hardware store calls “mirror hardware.” As you can see in the photo, it’s an easy way to attach hanging hardware through the entire board so that it won’t budge.

To prepare the board, locate a spot that’s a few inches from the top and exactly at the horizontal midpoint and drill a small hole. (I was a little too lazy to pull out the drill, and I actually just used a chunky nail to make my pilot hole. Worked just fine.) Insert the screw (which is threaded through the hook and the washer) through the board. Attach the nut on the other side.

The length of the screw is important here, because you want it to be as short as possible, but still long enough to go through and catch the nut. Mine is 5/8” long (measured from the very top to the very bottom) and it’s a perfect fit. There’s just a tiny little nub on the front of the board (and it’s behind a pocket anyway, so you’d never know it).
Next, lay your fabric face down and make a mental note of the where the lowest stitching line falls. You can line up the bottom of your board with this line. Once you have the board in place, grab your staple gun. You’re going to fold the edges of the fabric to the back of the board and staple them in place. Fold the raw edge of the fabric under for a more finished look.

I like to do a few staples across the bottom first and then flip over the board to make sure things are straight and centered. Make any adjustments that you need to, and then continue stapling, pulling the fabric taut as you go. I’ve used a regular stapler for this step before and it seems to do just fine. If you’ve chosen something other than Homasote for your board, you might consider using a glue gun rather than a staple gun. Use your best judgment.
Step Seven: Make your plans
As your final step, grab a handful of craft sticks (pretty readily available at craft and dollar stores) and sit down with your family and brainstorm about what you’d like to do in the next two months. Put each stick in the appropriate pocket and, once you’ve done it/eaten it/read it/seen it/built it/etc., move the stick over to the other side.

I like to keep a supply of sticks handy on my desk, in the kitchen, wherever ideas might come to me. Because remember: if you don’t write them down, they’ll be just like summer: gone before you know it. Have fun!
* All photos by Karen Jarsky
Karen Jarsky doesn't have a blog but is constantly amazed by and grateful for the things she can learn from other sewists and crafters who take the time to share ideas and advice on theirs. Karen will try sewing anything once, and sells some of her creations in her Etsy shop, Peanut and Beans.